October 15, 2010

A Speedy Delivery....

Just wanted to share with everyone the newest addition to our family....


Our little man arrived on Sunday 10th of October, 2010....a very special day and he just could not wait to arrive and got here 6 weeks early!  What a surprise!

He has now made it into an open crib where he will rest for a couple of weeks before coming home....I'm counting the days!

Cathy

October 1, 2010

Craft Catch-Up


Well...yet again there has been a while between posts!  I have been very busily sewing my heart out...nothing like biting off more than you can chew!

So, here's the run down of what I have been up to:


Dilbert Dinosaur


In the last couple of months I have made two of these dinosaurs from a Melly & Me pattern.  One was a present for my cousins sons christening.  I had the pattern for over a year and finally got around to making not one but two!


Wipes case and Nappy Holder


I have been nesting a little lately (something to do with being in my 3rd Trimester I believe), and a number of friends and family have had babies, so I decided to try and make some gifts.  I think that they turned out pretty good, don't you?


Binkie Blankets

Friends of my husband had twin boys, so I wanted to make them something special...blankies!  I found this cute pattern on the internet.  Don't you just love it?


Letterboxes


I wanted to make something special for my son and the baby for Christmas.  I saw this great idea on the Twelve Crafts til Christmas blog and knew straight away I had to make them!  I am going to give a post card or fabric letter to each relative (Grandparents, Great-Grandparents, Aunts, Uncles etc) so that they can write a letter to each child which can then also be played with.  It will be a keepsake that the children can treasure forever!


Hobby Horse


Z has become very fond of using anything as a horse...seahorse toys, books etc, so I thought it fitting to make him a hobby horse from a Melly & Me pattern.  He doesn't play with it...still a little to big for him and I don't think he quite understands the concept.  Although, I am in the process of making a second one in a different colour scheme as a gift for a birthday party coming up.

Santa Sack

I have always wanted to get into craft designing...just never had the confidence so I have started....with a santa sack for bubs!


This is the first panel that I have finished, however the photo does not give it justice.  I feel that it looks very special!  Hopefully I will complete the rest of it in time for the babies first Christmas!


Cot Quilt

I saw a quilt over at the Crazy Mom Quilts blog and just fell in love it.  So I have decided to make one for bubs...I feel like I am neglecting him/her.  As a second child, there really is not nearly as much to have to do to get ready!  Below is the basic layout.


Well, hope that you enjoyed my Craft Catch-Up!  Hope your days have been productive too!

Cathy

August 30, 2010

The Party Post....prepare for plenty of photos!!!!

In July we celebrated my little man's 2nd Birthday with a party for all of his little friends.  At the time he was very into Bob the Builder so we had no choice but to have a Construction Party (if the party was tomorrow, it would now have to be The Wiggles).

Well, lots of preparation went into the party which I just LOVED...and may have gone a teeny tiny bit overboard!

Anyway, here is how it turned out:


Guests were welcomed by a series of witches hats/construction cones leading them straight to the front door.


There was a new Birthday Banner and some 'Work Zone' signs posted around the house.


The table was set long enough for every child to have a place.  It was decked out with a Bob the Builder Table Runner, some 'Dig In' construction signs and colour co-ordinated plates, napkins, balloons and even fairy bread!


I couldn't go any further without posting an appropriate picture of the Birthday boy in his new party clothes.


 ...and one of him with his cousins!


The cake was decked out with die-cast toys of the Bob the Builder characters (I couldn't be bothered making them...and for $5.50 each at K-Mart it meant that the Birthday Boy could have them forever!).  The brown sugar was very effective as dirt!

Food....no party is the same without it...definately at our place - we always seem to over cater, but it is better to have too much than not enough!


...Colour co-ordinated rum balls...


...sugar cookies in the shape of all the appropriate carpentry tools...


...little racing cars...just because we could...


...jelly cups with chocolate tools in them....


...and what more could a tradesman want than a mountain of bite-sized iced doughnuts!

Well, I hope that you enjoyed your visit to the Birthday party! I hope to be back soon with some really crafty stuff!

Keep Crafting!
Cathy

August 6, 2010

Bob The Builder....Yum Yum Yum!!!

Well....sorry I have been away for quite a while.  It's just been one thing after another!  We had Z's 2nd Birthday party...which had to be postponed because we all got a tummy bug but was still a roaring success, but I will have to post about that later.  I have heaps of photos to share!

This post is about the cake that I made for the night of Z's 2nd Birthday night.  The theme for his party was construction and this was also so the night of his party...with the cake at least!  So I am going to share with you how I iced the image on the top of the cake.  You could do this with any image you choose, but of course, ours was Bob the Builder.  You can download the template here.  You may need to resize it to suit the shape of your cake.


Once you have downloaded the image, you should get something similar to that above.  You then need to cut it out into the 2 main sections - the hat and the face - I didn't worry about the hair as that was just a nearly straight line and didn't feel that I needed a guide.

Once you have the sections cut out, place them all on the cake so that you can make sure that there is room for the entire image.  Once you are happy with placement, remove every section EXCEPT for the face (see below).


Take a very sharp and pointy knife or a skewer and make a line around the shape so that you can see it in the icing.  When you take off the piece of paper, it should look similar to the line I have outlined below


It is now time to make your icing!  I used pure icing sugar, something I always do, as it seems to keep its shape better that the soft icing sugar.  You need to make the icing fairly thick so that it doesn't ooze out of your piping bag.  Now take the piping bag with a narrow tip and fill with icing.  Pipe a line along the line that you made in the icing with the knife/skewer, then continue making more and more lines inside that initial line to fill the face section.  Often the lines will merge together, but if not you may need to brush over the icing with a butter knife or spatula to even it out.

Unfortunately I don't have any photos of this.  Z kept getting out of bed and interrupting me so that's my excuse and I'm sticking to it!

Repeat this process for the hat and the hair, marking the shape with a knife or skewer and then filling with the appropriate coloured icing in a narrow nozzled piping bag.  Before you put away the yellow icing, put a star/flower tip onto the piping bag and pipe stars around the outside of the cake.  I feel that this just finishes off the cake and helps it to stand out from the plate.

Once I had finished icing the hat, face and hair, I took a tube of black 'Queen' writing icing that I purchased at the supermarket to mark all of the lines, the nose, eyes, mouth and ears.


You should end up with something similar to the above. 


Add some candles and you're good to go! 


I was quite impressed.  Z knew exactly who the picture was of on the cake.  It has inspired me to do something like this again.  I wonder who his favourite will be next year?

Anyway, Happy 2nd Birthday Z!  We love you very much!


This post was added to:

Making


CreativeShareWednesdays

July 7, 2010

New Blog: Inspiration from Blogland

Hi Everyone,

Just wanted to let you know that I have started up another blog that will work/integrate with my current blog and the Fabulous Friday Finds.  I really wanted a way to collate the awesome projects that I find, and I think that this is the best way!  The blog is called Inspiration from Blogland which will really work more as a page from this blog!


A button to link from this page etc, will be coming in the next week.  I have a busy few days and weekend ahead of me.  Z turns 2 tomorrow!

Hope that you like what you find!

Cathy

July 4, 2010

Fabulous Friday Finds #3 - on Sunday!

Firstly, I have to apologise, I have been so busy and tired (thanks Z!) that I never got a chance to post my Friday Finds.  Anyway, I seem to spend a LOT of time reading blogs and finding awesome projects that I would just love to attempt but never seem to get around to it.  So rather than starting to think that I am wasting my time (life) looking at all of these wonderful blogs, I thought I could put this time to use and share some of the finds with you all!  I'll try and give you around five great finds each week.

This week there are a couple of child focused items and a project perfect for any quilter out there!

1. Toddler Tool Box


With a 2nd Birthday this Thursday for a little boy of ours who is VERY into Bob the Builder, I have to make one of these cute tool boxes!  If you would like to make one too, it is by Maggie Reno of the Maggie Muggins Designs blog.  I'll let you know how mine goes!

2. Phoebe Block Keep


Cheryl Goss of Willowberry Designs has a gorgeous tutorial for a block keep over at Quilt Fabric Designs.  I think that I need one of these.  Particularly for my Farmers Wife Quilt Blocks...eventually there will be 110 of those blocks.  I have some owl fabric just beckoning to be made into this project!

3. Car Pillow Tutorial


Over at the Noodlehead blog, Anna has made a gorgeous car pillow/cushion.  It is soooo cute!  It would be just perfect for on a little boys first ever bed don't you think?

4. Birdcage Tutorial


Isn't this just the cutest project you have ever seen?  If this baby is a little, I so need to have one in the nursery!  You can find the 'how-to' over at the Running with Scissors blog by Jessica.  It is so gorgeous and quaint!

Well, that's my 4 Fabulous Finds for the week.  I hope that you enjoy them as much as I do!  Why not support the creators of these wonderful projects by either following or commenting on their blogs?

If you have a project tutorial that you would like shared, please don't hesitate to contact me!  If there is enough demand, we might even start up a Link Party!

Until next time!  Keep Crafting!
Cathy

June 25, 2010

New Header

What do you think of the new header?

I'm not quite convinced yet.  Will give it a couple of days and then decide!

Hope that you have a great weekend!

Cathy

Fabulous Friday Finds #2

I seem to spend a LOT of time reading blogs and finding awesome projects that I would just love to attempt but never seem to get around to it.  So rather than starting to think that I am wasting my time (life) looking at all of these wonderful blogs, I thought I could put this time to use and share some of the finds with you all!  I'll try and give you around five great finds each week. 

Again this week we are quite child focused.  I guess one of the hazards of being a stay-at-home Mum.  Your focus is most often on your child(ren)!  Shall we start?

1. Baby Wipes Case


Being almost halfway through our pregnancy, there are a lot of baby-focused tutorials that have really been drawing my attention lately.  This one is a wonderful step by step guide on how to cover a small baby wipes container.  I still use this for my nearly 2 year old so think I will start with one for him!  The tutorial can be found on the Crabtree family Blog and they look just darling!  Can't wait to cover mine...hmmm....think I have some fabric there leftover from the quilt I made him......

2. Pretend and Play Car Carrier Kit


Elizabeth at Twelve Crafts til Christmas has set herself quite a challenge.  For a novice sewer she has put together a series of GREAT tutorials for all of the items you could possibly need to play postman.  I think that I'll have to put this one on my Christmas Present Craft to-do-list!

3.Fabric Dollhouse Tutorial


With another child on the way and a lot of appointments and a hospital stay on the way I am looking for projects that Z can take with him to keep entertained.  The fabric dollhouse tutorial at UK lass in US and also be made as a barn and would be great to keep little fingers busy.  Great job Dawn!

4. Doll Diapers


I have heard that it is a good idea to get your little one a baby of their own when a new baby is going to join the family.  This way he/she can care for their own baby as you are caring for yours.  Over at A Girl and a Glue Gun, Kimbo has a tutorial on making diapers for dolls.  I can see this coming in very helpful as babies go through a lot of nappies and Z is sure to want to help!  There are tutorials for both a sewn and a non-sewn version.

5.  Creative Park by Canon


It is amazing the items that you can download from the Creative Park by Canon webpage and then print out and create.  There are so many choices, it's hard to know where to start!  Think I need to purchase some thicker paper....want to make a dump truck for Z's Birthday.  There is bound to be something to catch your eye!

Well, that's my 5 Fabulous Finds for the week.  I hope that you enjoy them as much as I do!  Why not support the creators of these wonderful projects by either following or commenting on their blogs?

If you have a project tutorial that you would like shared, please don't hesitate to contact me!  If there is enough demand, we might even start up a Link Party!

Until next time!  Keep Crafting!
Cathy

June 23, 2010

Happy Birthday Bunting Banner Tutorial
Well, we are in full-on 2nd Birthday preparation mode here and as such, I decided to make a Happy Birthday Bunting type Banner.  I was going to colour co-ordinate it with the construction party theme but in the end only used one of the colours so that the banner could co-ordinate with future parties without the need to recreate the complete banner.  Although I do love my sewing, it seemed a bit wasteful if I was to make a new banner each year.

Materials:
45cm of 3 different co-ordinating fabrics (bunting base materials)
20cm Felt (for lettering)
4m cord in co-ordinating colour
Co-ordinating thread
Chopstick/turning stick
Masking Tape
Rotary cutter and quilting ruler
Lettering Pattern (Download Here)

Directions:
NOTE: Be sure to read all instructions before proceeding.  If you have any questions, I am happy to answer them.  Just leave a comment or email me!

1. Fold your 3 pieces of base material in half between the selvedge’s (horizontally).

2. Using your rotary cutter, cut along the material in 6” increments.  You should get 7 pieces.


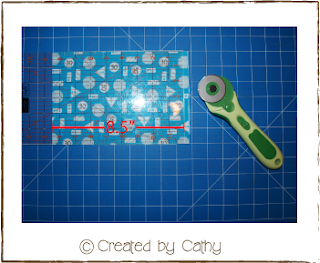
3. With the material still folded in half, and measuring from the fold, cut the material to 8.5” tall (unfolded this would be 17”).  By keeping the fold, you save yourself a row of stitching!


4. Turn the material in half so that the right sides are facing.  You are now getting ready to sew the seams together.  You want to stitch from 1” below the folded seam right down the rest of the long side.  You then need to sew along the bottom of the fabric leaving a 2” gap – this is the gap through which we will turn the fabric right side out.


5. Trim the corners so that you get lovely corners when the fabric is turned right side out.


6. Through the 2” gap in the bottom seam, turn the fabric through.  You may wish to use a chopstick or something similar in the corners to get a nice crisp shape.

Be sure to turn the edges in at the folded edge of the fabric.  This gives you the casing to thread the cord through later.


7. Now that the fabric is turned through, we are going to do some top stitching.  This gives the flags a nice shape and helps it to sit well when hung.

From the folded edge of the flag, sew a seam 1/4” down.


8. Next you want to sew a seam 1” down from the folded edge of the flag, continuing around the remainder of the flag (as per the picture below).


You now have a completed flag base.  Complete steps 4-8 for each of the pieces of fabric.

9. Download the Lettering Template (here).  Cut out each of the letters.

NB: Every letter of the phrase ‘Happy Birthday’ is included in the Word Document.  You do not need to cut out the letters again if they are repeated.  You can reuse the pattern pieces.

NB2: The template is in Microsoft Word Format so that you can add a name or a number (eg 2nd) to the banner, if desired, in the same type.  I have used Arial Black in a 350pt type.  You could choose a different font if you desire.  I chose this font as it is large and quite wide which makes it easier to sew on.


10. Take your piece of felt and pin the letter pattern pieces onto it.  Using sharp fine pointed scissors, cut out each letter.


11. Pin the felt letters onto your flags.  You need to measure 2.5” from the base of the flag to the base of your letter.  For letters that have descenders (the parts of the letter that would be below the line if you were handwriting the letters), you need to measure to the main part of the letter where it would normal sit on a piece of writing paper.


12. Using a co-ordinating thread, sew along the outer edges of the felt letters.  I used the zipper foot on my Brother Sewing machine so that I could get as close to the edge with my stitching as possible.


Trim off any loose stitching threads to neaten the flag – now just to thread them together!

13. Using a thin chopstick, or something similar, masking tape the cord to the end so that you can use it like a needle.


14. Thread the chopstick (or similar item) through the casing that we made at the top of the flag (near the folded edge of the fabric).


Repeat with the remaining flags.

15. Your finished Happy Birthday bunting:


If you make this project, I would love to see it!  Please email me a photo.  I love to see other peoples interpretation of projects!

In the Meantime, don't forget to Keep on Crafting!

Cathy